Canoe Project
May 20, 2024
 About the Canoe project
- We are just starting to build a 20′ Freight Canoe in the workshop. This is a kit project made from 5mm marine ply.
- This page will follow the project and will include pictures as well as commentary on issues that arise as we progress.
- At the moment I have taken delivery of seven sheets of 8′ X 4′ pre cut marine ply.
- The plans shown below were obtained through Selway Fisher Design in Scotland.
Basic plan and elevation of 20′ marine ply Canadian Canoe
 Finally on Feb 1st 2010 we got going. All the sheets have been stored since before Christmas in Joe’s workshop. So with the stove fired up to keep away the evening chill we began to cut the shapes away from each sheet. The shapes of each piece are held in place by a little piece of timber which the scrool saw or router left on purpose. So each piece can be easily detached with a hand saw.
20′ Freight Canoe in sheets of 8 X 4 Marine ply
 Having detached the pieces carefully the edges are now cleaned with a plane.
This canoe has been designed for a client who wanted a canoe which would take a crew of 8 or so adolescents. She is designed to be built and transported in two halves (although she can be built in one piece) and bolted together at the waters edge. Construction is based upon the simple stitch and tape method using pre-shaped hull panels. Buoyancy may be built-in under the seats or these areas may be used for stowage. She may use a similar sail plan to that shown for the 20’ Sea Jay and she can be fitted with outriggers.
Large canoes of this type were used for transporting freight in North America and we have retained the same type of hull section which has tumblehome to produce a wide waterline beam. She has 4 planks per side with a shallow ‘V’ to the bottom. She uses approximately 8 sheets of 6mm Exterior or Marine plywood and weight will be approximately 180 lbs.
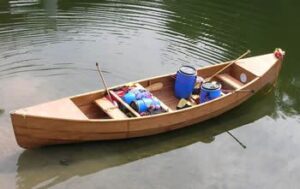
20′ Marine ply Canadian Canoe
 The Seating arrangements in the above canoe have been altered slightly from the original plan. I also hope to make one or two slight changes to the seating arrangement. I will keep you posted on that one later in the build.
Feb 5thWith all the boards now cut out and the edges cleaned we can begin the assembly. We could at this stage make a decision to assemble the Canoe in two halves making it easier to transport. (In this case you would bolt the two halves together at the side of the river). This would involve cutting in half the 4 center boards. However we have decided to proceed with a full boat build defer that decision to a later stage. Now then the next thing is join all the timbers in their entire length, end to end. This will involve butting the ends together and taping the joints on both sides and fixing with either polyester or epoxy resin. Time to call in an expert.
Feb 10thWith much thanks to Joe and Chris we got going on the assemby. we had set up a 20ft work bench so we could lay out one full half of the canoe. Now we had to glue and tape the timbers together end to end.
Building a Canoe. Assembly starts with joining timbers end to end
 With the fire in the workshop started earlier it would be easier to work with the Glues and resins. (thanks Joe). All the canoe timbers were laid out on the workbench. Next we had to put an edge on the end of each timber in preparation for the glue and to give it more surface to adhere to. We now glue the timbers together and screw them down so that they cant move. Having glued and screwed the canoe planks we are now ready to fiberglass the joints. Chris Collins is a local boatbuilder and his help, instruction and guidance was very much appreciated at this stage.
Canoe building. Completed joint. Glued and taped
 You can see we had a piece of plastic underneath all the joints so the bonding materials would not stick to the workbench below. Having completed one half of the canoe we will leave the joins settle and cure for a couple of day. Next we have to turn the planks over and complete the join on the other side.
Canoe building project. Joe and Chris
Made a lot of progress today. With all the planks glued together it was time to start stitching. We started with the two base planks. Once we had those two together it was drill and stitch with the other planks. We made steady progress and put in the centre seat support and several other seat supports along the length of the canoe. We quickly noticed some great shape taking place.Feb 20th
Centre seat support being stitched in place
 You can use garden wire for the stitching but we used small cable ties. By using the cable ties we were able to loosly ties the planks together and then tighten as required.
Canoe build. Centre seat supports being stitched in place
 Once a few of the seat supports were stitched in place the canoe began to show its shape. This was very exciting and a big relief to see that all the planks were coming together and creating the proper shape.
Canoe build. Starting to take shape
 We now have three out of four planks stitched together. Next we have to put in the bow and stern bulkheads. Then its time to tackle the bow and stern and pull all the ends together.
Canoe build. 3 out of 4 planks now in place
We now have all the planks stitched together. The bow and stern are left open. We will bring them together last.March 4th
Taking shape
 Now we have to tie in the bow and stern. There is considerable pressure on the lower planks in order to get the hull to turn up to shape into the bow and stern. We had to use stronger cable ties for this. We considered screwing in support planks on the inside but in the end the stronger cable ties did the job.
Bow and stern now tied together
The next step is to start the glueing process. We will begin on the inside by applying glue between the cable ties. we will make the glue quite soft so it can be forced between the planks. To avoid waste we will first tape the outside to stop the glue from running through too much.Canoe build project – Taping the outside before we apply the glue between the planks on the inside
Search Blog
Adventure Activities
Got a Question?
Do not hesitate to give us a call. We are an expert team and we are happy to talk to you.


 About the Canoe project
 Feb 20th
 March 4th